Hello, and welcome to this video about precision, accuracy, and error! Today we’ll learn about the difference between precision and accuracy and when it’s used. We’ll also discuss different types of errors.
Reviewing the Basics
Before we get started, let’s review a few things. First, it’s important to remember that many math problems involve measurements of real-world quantities. These measurements include distance, weight, area, volume, temperature, and time. Whenever a quantity is being measured, there is some approximation occurring.
For instance, let’s say you need to measure a length of a wall with a tape measure before hanging a picture frame. To make sure you have the exact length, it’s best to measure the space more than once. When measuring something more than once, it’s possible to have different results. Even though you used the same tool (a tape measure) and are measuring the same space (the wall), differences in measurement can occur.
These differences are called variations, or errors. In this context, the term error does not mean a mistake. Instead, it refers to the difference between a measurement and its actual value, which is also called the known value.
Mathematicians use certain words to talk about differences between a measurement and its known value.
Precision
Precision refers to how close repeated measurements are to one another. In other words, it’s how often we get the same result, regardless of if it’s correct or not. If the measurement is consistent, it is considered to be more reliable.
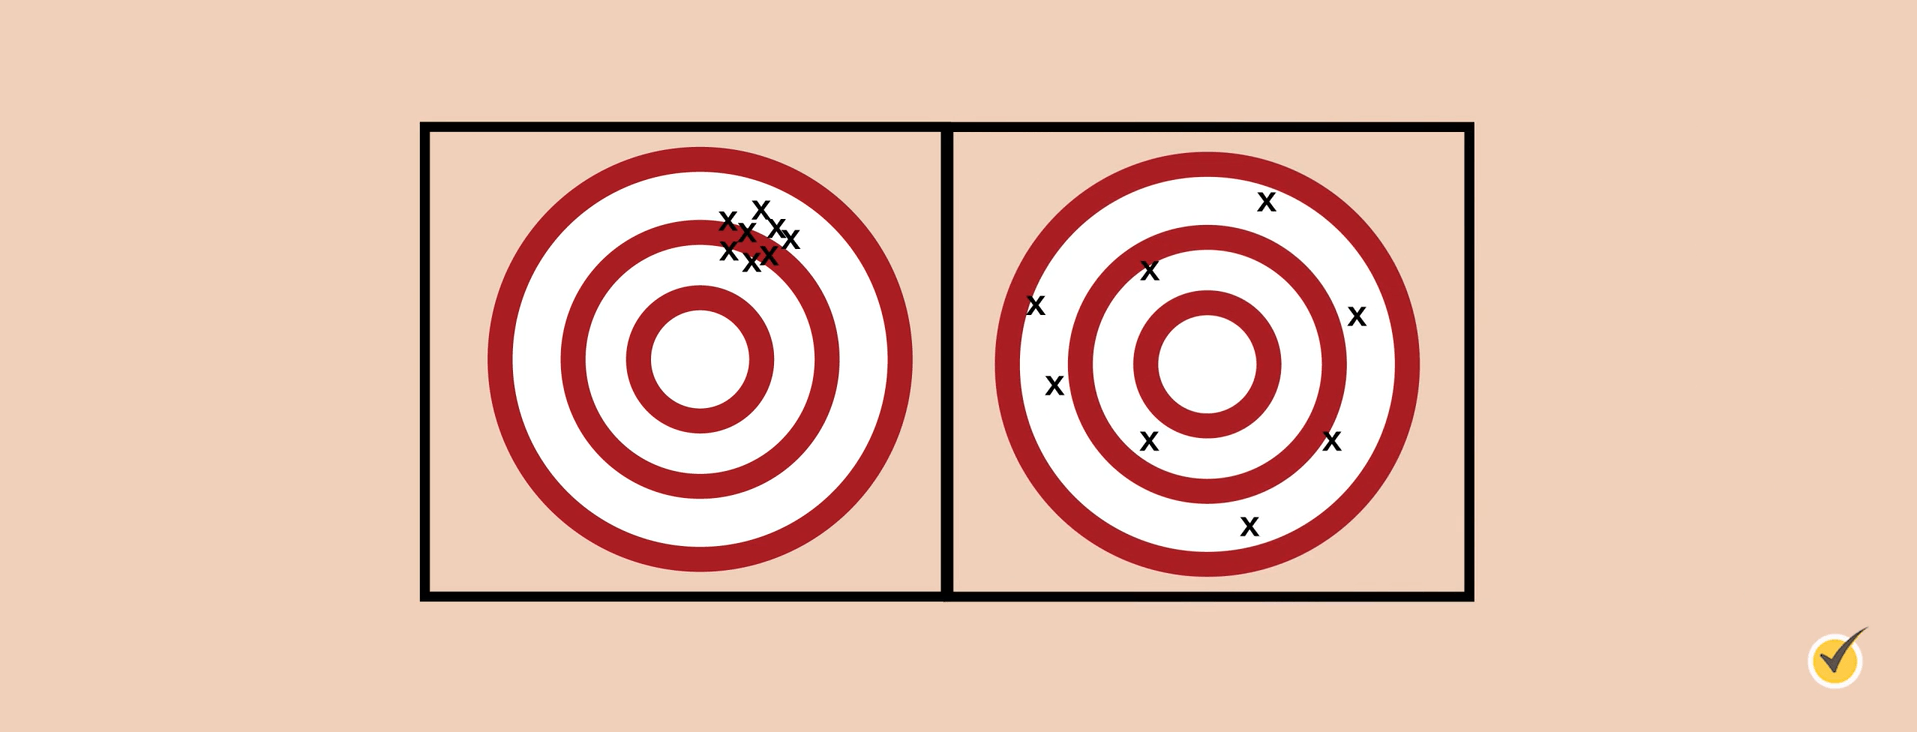
Think of the measurements as points on a target.

The target on the left shows precision because all measurements are approximately the same. The target on the right does not show precision because these measurements are not approximately the same.
Accuracy
Accuracy refers to how close a measurement comes to the true or actual measurement of the object. In other words, it’s used to describe how close the data is to the correct data.
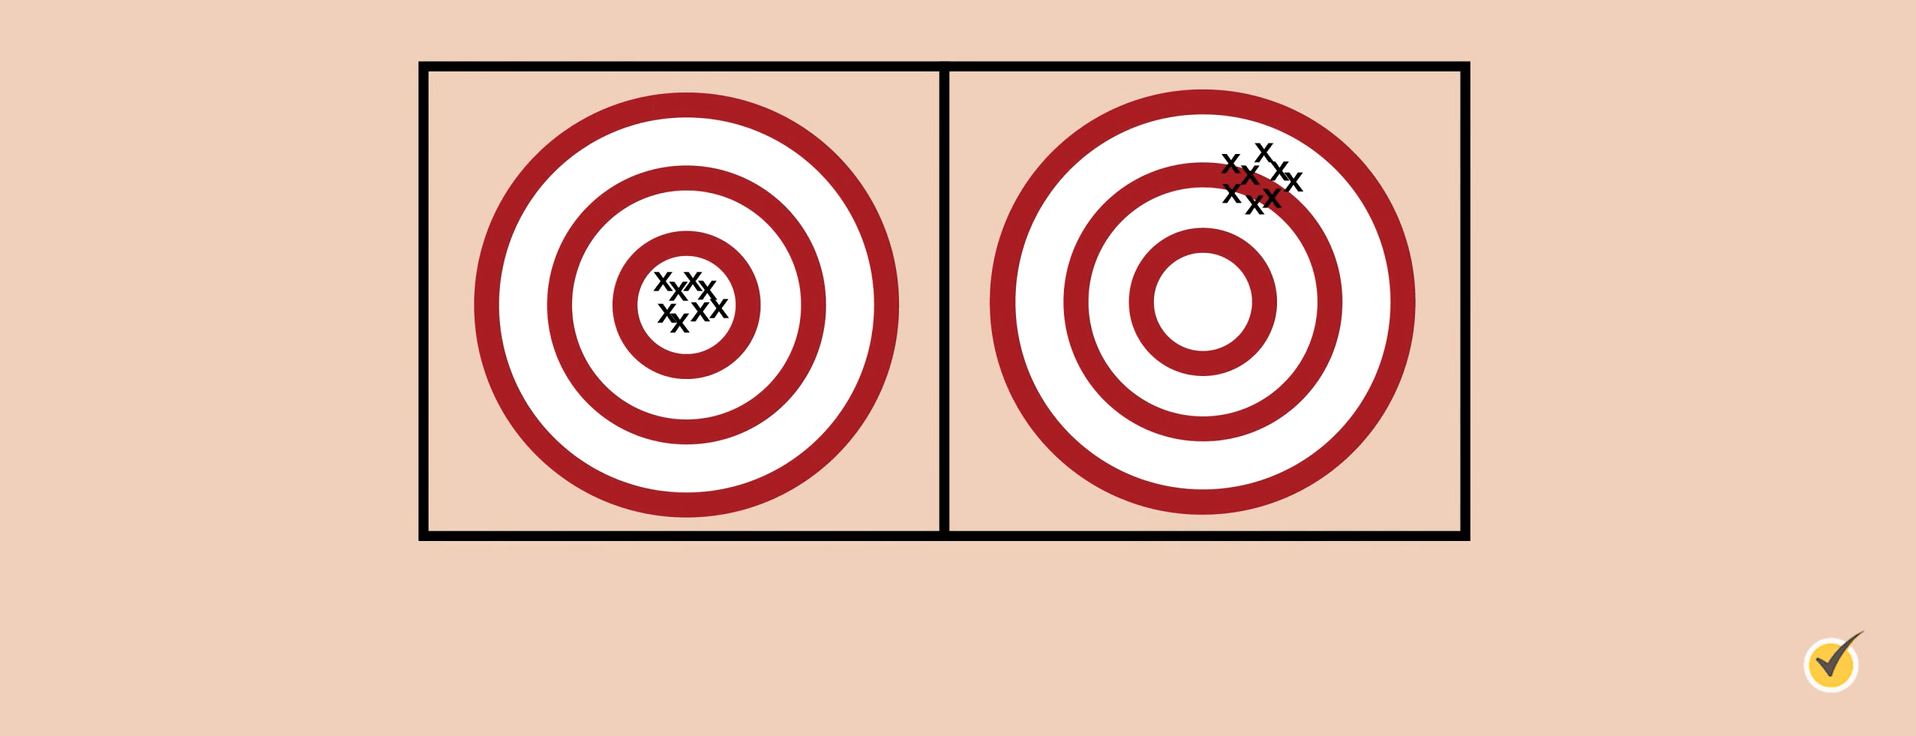
Consider these two targets:

Assuming that the true or actual measurement is the target’s bullseye, the target on the left shows accuracy and precision. All measurements are located at the bullseye. The target on the right does not show accuracy, even though it is precise, because the measurements are not located at or near the bullseye.
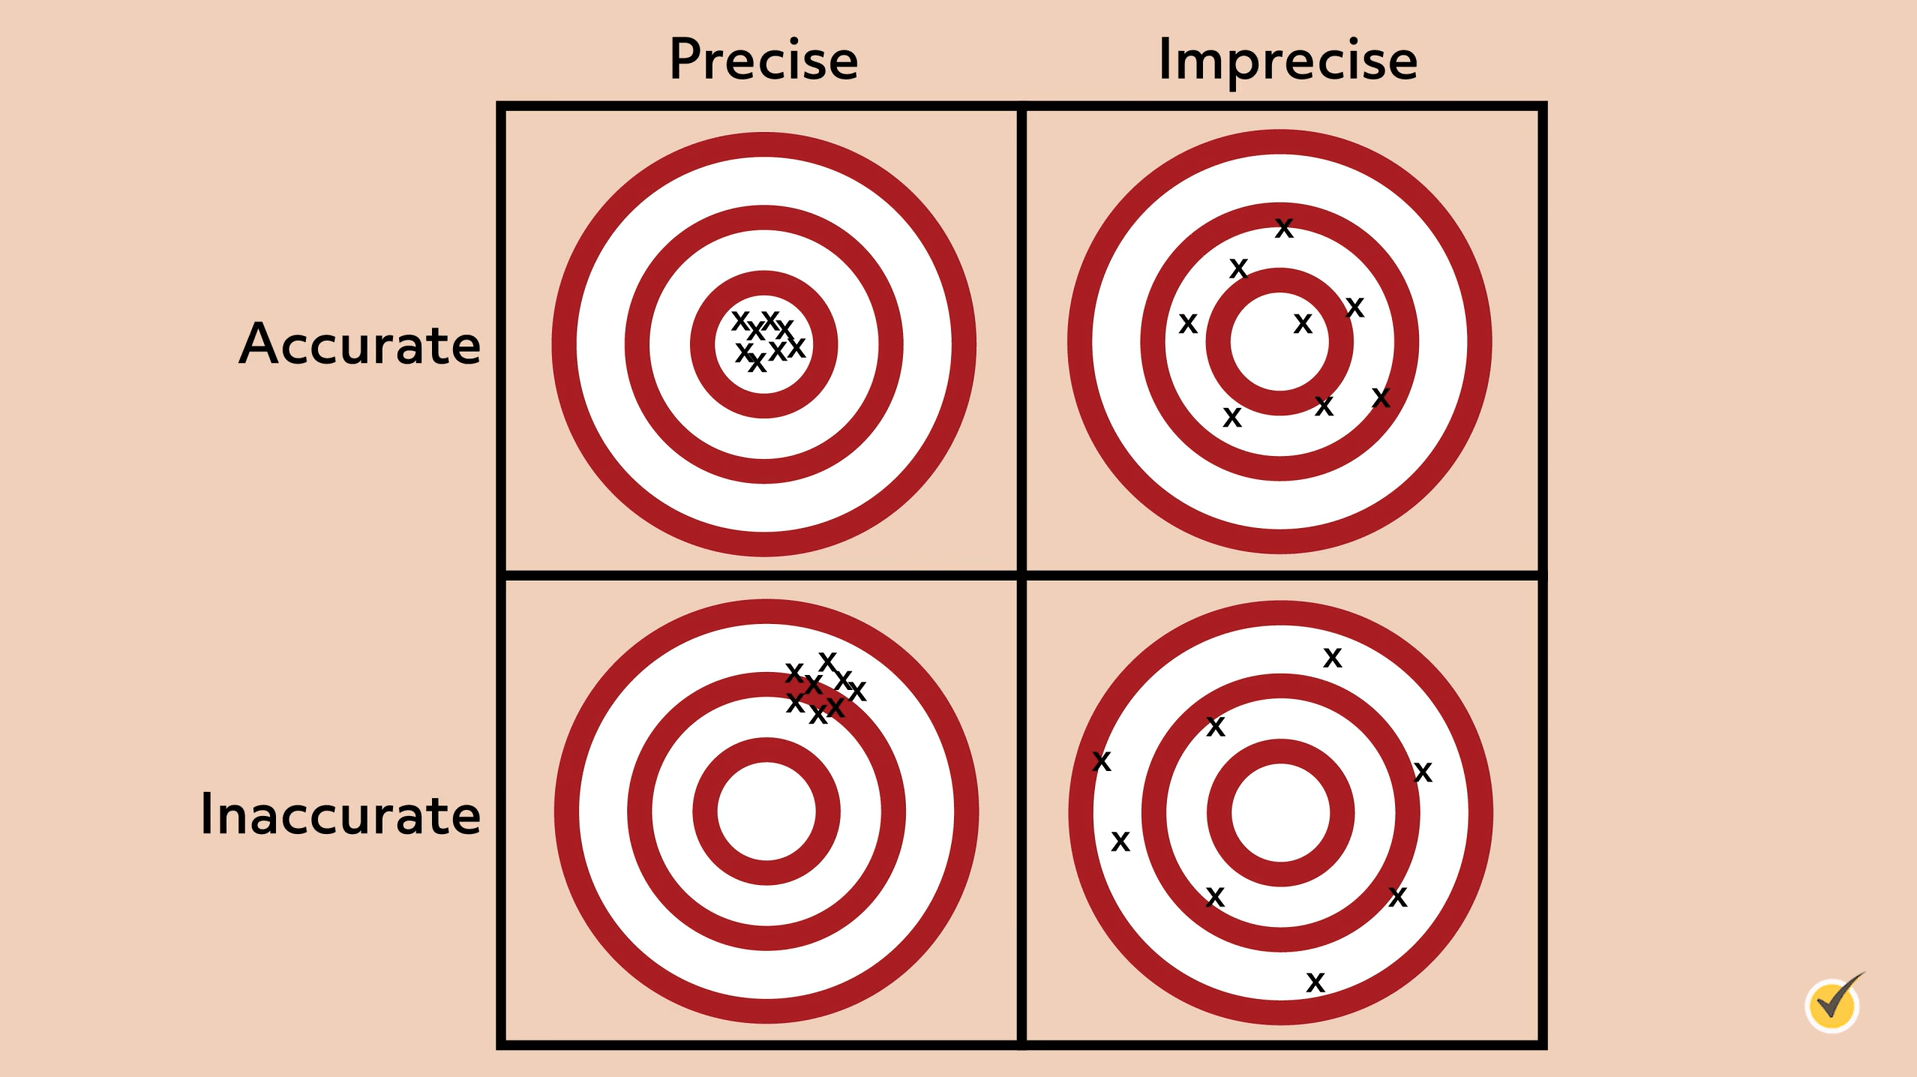
Since accuracy and precision mean two different things, measurements can be both accurate and precise. Measuring systems are considered valid if they are both accurate and precise. On the other hand, measurements can be precise without being accurate, and they can be accurate without being precise. Consider these targets:

As you can see, the upper left target shows measurements that are accurate and precise. All measurements are consistent and at the bullseye. In the upper-right target, we can see measurements that are accurate but imprecise. These measurements are not consistent but they are all close to the bullseye. In the lower-left target, the measurements are precise but inaccurate. Although they’re consistent, the measurements are not near the bullseye. Finally, in the lower right target, the measurements are neither precise nor accurate. They are inconsistent and not near the bullseye.
Now that we’ve covered accuracy and precision, let’s talk about errors.
Errors
Approximate Error
Approximate error refers to the amount of error in a physical measurement. Approximate error is often reported as the measurement, followed by the plus or minus sign (\(\pm \)) and the amount of the approximate error.
For instance, consider an approximate error of \(6.8\pm 0.05\) inches. This gives us a range of \(6.8-0.05\) to \(6.8+0.05\), which equals 6.75 to 6.85 inches. This range is known as a tolerance interval. It is the range in which measurements are tolerated or considered acceptable.
Greatest Possible Error
The greatest possible error (also called the maximum possible error) is calculated by adding or subtracting half of the measuring unit to the measurement. For instance, let’s say you measure the length of a wall to be 90 inches. The unit of measurement is 1 inch, so the greatest possible error is one-half of 1 inch, or 0.5 inches. In other words, any measurements in the range of 89.5 inches to 90.5 inches are considered valid. The tolerance interval is written as \(90\pm 0.5\) inches.
Let’s look at an example of using the greatest possible error together. One gallon of water weighs about 8.3 pounds. What is the greatest possible error and the tolerance interval created by that error?
First, we need to identify the unit of measurement. In this case, the unit of measurement is one-tenth, or 0.1. Therefore, the greatest possible error is one-half of one-tenth, or 0.05, and the tolerance interval would be \(8.3\pm 0.05\) pounds.
Now it’s your turn.
Pause the video and see if you can do this one by yourself. When you’re ready, press play and we’ll go over everything together.
Okay, let’s work through this.
First, we need to identify the unit of measurement, which is 1 pound. The greatest possible error is one-half of the unit of measurement, which is 0.5 pounds. Therefore, the tolerance interval is \(22\pm 0.5\) pounds.
Great job!
Absolute Error
Now onto some different methods to show errors in measurement. One of these methods is called absolute error. The absolute error is the absolute value of the difference between a measurement’s measured value and its known value.
The difference is always reported as a positive number, which is why there are absolute value bars shown in the formula. Let’s look at an example.
Say you know a chemistry experiment will yield 10 milliliters but your solution is 9.5 milliliters. Since \(10-9.5=0.5\), the absolute error in this scenario is 0.5 milliliters.
When the known value is not known or is not given, then the absolute error is equal to the greatest possible error. For example, in the measurement \(18\pm 0.5\) centimeters, no known value is given. In this case, the absolute error is 0.5 centimeters.
Relative Error
Another way to represent errors in measurement is with relative error. Relative error shows the significance of an error by comparing it to the original measurement. To find the relative error, find the difference between the measured value and the known value, and divide its absolute value by the known value.
Let’s find the relative error of the chemistry experiment example we just discussed. Recall that the known value was 10 milliliters and the measured value was 9.5 milliliters. To find the relative error, substitute these values into the formula and solve.
Since our measured value is 9.5, and our known value is 10, take the absolute value of \(9.5-10\) and divide it by 10.
\(=\frac{|9.5-10|}{10}\)
\(=\frac{|-0.5|}{10}\)
\(=\frac{0.5}{10}\)
\(=0.05 \text{ milliliters}\)
If there is no known value given, then the relative error is found by dividing the greatest possible error by the measured value.
In the measurement \(18\pm 0.5\) centimeters, no known value is given. Recall that in this case, the greatest possible error is 0.5 centimeters. To find the relative error, substitute these values into the formula and solve:
Compared to absolute error, relative error is often seen as more useful because absolute error doesn’t show the significance of the error in context. For example, a soccer field is 2,700 inches long and your measurement is off by 0.5 inches, 2,699.5 inches. In this case, that 0.5 inches won’t throw off your calculations too much.
However, if a post-it note is 3 inches long and your measured value is off by the same 0.5 inches, and you get 2.5 inches, that’s a much more significant difference due to the size of the post-it note.
In our relative error formula, dividing by the known value gives us that context of if our object is off by 0.5 inches compared to a really large number like with our soccer field, or off by 0.5 inches compared to a really small number like with our post-it note. Absolute error only tells us that we are off by 0.5 inches.
Percent of Error
A third way to represent errors in measurement is by calculating the percent of error. To find the percent of error, multiply the relative error by 100 to make it a percent.
In the chemistry example, we found that the relative error was 0.05 milliliters. 0.05 times 100 equals 5, so the percent of error in this experiment is 5%.
Now that we know how to show different errors in measurement, let’s take a look at an example together.
Consider a bedroom with a known length of 16 feet. The bedroom is measured to be 16.5 feet long. Let’s find the absolute error, relative error, and percent of error.
The absolute error is the absolute value of the difference between the measured value and the known value.
\(=\left | 16.5-16 \right |\)
\(=0.5\text{ feet}\)
To find our relative error, find the difference between the measured value and the known value, and divide its absolute value by the known value.
\(=\frac{\left | 16.5-16 \right |}{16}\)
\(=\frac{0.5}{16}\)
\(=0.03125\)
To find the percent of error, multiply the relative error by 100.
Therefore, the difference in measurement of the bedroom was 0.5 feet, which is just over a 3% error.
Let’s take a look at another example. Consider the measurement of \(2.5\pm 0.5\) inches. Unlike our last example, there is no known value given.
The absolute error is the difference between the measured value and the known value. Remember that if there is no known value given, then the absolute error is equal to the greatest possible error, which is 0.5. Therefore, the absolute error is 0.5 inches.
To find the relative error with no known value given, divide the greatest possible error by the measured value:
To find the percent of error, multiply the relative error by 100. When we do this, we’ll get 20%.
Therefore, the 0.5-inch difference in measurement is a 20% error.
Now it’s your turn. I’m going to give you a set of measurements, and you’re going to find the absolute error, relative error, and percent of error. This one is a little more challenging, but I know you can do it.
Pause the video and see if you can do this one by yourself. When you’re ready, press play and we’ll go over it together.
Now that you’ve tried this problem by yourself, let’s go over it together.
The absolute error is the absolute value of the difference between the measured value and the known value. Our measured value is 5.5, and our known value is 5.8.
\(=\left | 5.5-5.8 \right |\)
\(=\left | -0.3 \right |\)
\(=0.3\text{ centimeters}\)
To find the relative error, find the difference between the measured value and the known value, and divide its absolute value by the known value.
\(=\frac{\left | 5.5-5.8 \right |}{5.8}\)
\(=\frac{0.3}{5.8}\)
\(=0.05172414 \text{ centimeters}\)
To find the percent of error, multiply the relative error by 100.
Therefore, the difference in measurement of the circle is 0.3 centimeters, which is just over a 5% error.
I hope this video about precision, accuracy, and error was helpful. Thanks for watching, and happy studying!
Precision and Accuracy Practice Questions
Five bullets are shot at a target, aiming for the target’s bullseye (the target’s center). All five bullets hit the target. Which of the following targets best shows that the five bullets were accurate but imprecise?


Bullets that hit closest to the bullseye are considered accurate, but they do not necessarily have to be close to each other.
Choices C and D are considered accurate compared to choices A and B since all five bullets hit closer to the bullseye. Imprecise shots do not land close to each other on the target (but they may still be considered accurate).
The hits on the target for Choice C are considered imprecise since they are not as close to each other as the hits in Choice D. Therefore, Choice C is the best answer choice.
One liter of water weighs approximately 2.2 pounds. What is the tolerance interval created by the greatest possible error when a liter of water is weighed?
The greatest possible error (also called the maximum possible error) is calculated by adding or subtracting one-half of the measuring unit to the measurement. The unit of measurement for our liter of water is measured to the nearest one-tenth of a pound. So, the greatest possible error is one-half of 0.1 pounds, which is 0.05 pounds.
A tolerance interval is the range of values in which measurements are tolerated or considered acceptable. The tolerance interval can be written as the given measurement \(\pm\) the greatest possible error. So, the tolerance interval for the weight of one liter of water is \(2.2\pm0.05\text{ pounds}\).
It is known that the volume of a given cube is 27 cm3. You measure the length of one of the sides of the cube and calculate its volume to be 24.21 cm3. What is the relative error in your calculation?
The relative error is the ratio of the absolute error and the actual value of a measurement.
The absolute error is the absolute value of the difference between a measurement’s measured value and its known value.
\(\text{Absolute error }\)\(= |\text{measured value}-\text{known value} |\)
So, the relative error is:
\(\text{Relative error }\)\(=\large{\frac{| \text{measured value}-\text{known value} |}{\text{known value}}}\)
The known value for the volume of the cube is 27 cm3 and the measured value is 29.79 cm3. So, the absolute error is:
\(\left|24.21\text{ cm}^3-27\text{ cm}^3\right|\)\(\:=\left|-2.79\text{ cm}^3\right|=2.79\text{ cm}^3\)
Then, the relative error is:
\(\text{Relative error}=\dfrac{2.79}{27}\approx0.103\)
You measure the length and width of a rectangular picture frame with a metric ruler. You then calculate the area using your measurements to be \(25,402.58\text{ cm}^3\). What is the greatest possible error and the tolerance interval created by that error in centimeters?
The greatest possible error (also called the maximum possible error) is calculated by finding one-half of the measuring unit to the measurement. The unit of measurement for our calculated area of the picture frame is to the nearest hundredth of a square centimeter, so the greatest possible error is one-half of 0.01 cm, which is 0.005 cm.
A tolerance interval is the range of values in which measurements are tolerated or considered acceptable. The tolerance interval can be written as the calculated measurement \(\pm\) the greatest possible error. So, the tolerance interval for the measured area of our picture frame is \(25{,}402.58\pm0.005\text{ cm}\).
You are making some cookies from scratch. The recipe for the cookie batter calls for one cup (8 ounces) of water. You put 8.2 ounces of water into the cookie batter. What is the percent of error of your measurement?
First find the relative error, then multiply its value by 100 to convert it to a percent of error.
The relative error is the ratio of the absolute error and the actual value of a measurement. The absolute error is the absolute value of the difference between a measurement’s measured value and its known value.
\(\text{Absolute error }\)\(=\left|\text{measured value}-\text{known value}\right|\)
So, the relative error is:
\(\text{Relative error }\)\(=\large{\frac{\left|\text{measured value}-\text{known value}\right|}{\text{known value}}}\)
The known value for a cup of water is 8 ounces, and the measured value is 8.2 ounces. So, the absolute error is \(\left|8.2\text{ oz}-8\text{ oz}\right|=0.2\text{ oz}\). Then, the relative error is:
\(\text{Relative error}=\dfrac{0.2}{8}=0.025\)
So, the percent of error is \(0.025\times100=2.5%\).
